Showing posts with label WinRM. Show all posts

Tuesday, September 18, 2012

PowerShell v3 everywhere

If you have not caught wind of this yet, you can download and install the “Windows Management Framework 3.0” on your boxes that are not Server 2012 or Windows 8.

As in the past this is more than just PowerShell, it includes WMI and WinRM compatibility updates.  (just not a big BITS update like v2 did).

You can find it here: http://www.microsoft.com/en-us/download/details.aspx?id=34595

This is for Windows 7 SP1 and Server 2008 SP2 or Server 2008 R2 SP1.

And, don’t forget Update-Help after you install it.

But you might as well be on your way to managing your Server 2012 / Windows 8 infrastructure the PowerShell way.

If you need .Net 4 you can find that for Server over here: http://www.microsoft.com/en-us/download/details.aspx?id=17718

And for Server Core here: http://www.microsoft.com/en-us/download/details.aspx?id=22833

If you run an OS that is older.  I am sorry, MSFT does not look back.  You can be one version old, but XP / 2003 is way out.  Winking smile

Friday, November 11, 2011

Hyper-V WMI association NULL returns and stopped VMs

I spent way too much time staring at this today until it dawned on me that my VM might need to be running for certain associations to be activated and working.

All I was trying to do is to get a PowerShell script to return the MAC address of the Legacy Network Adapter of a VM.

Ben Armstrong has been more than generous at giving samples to the community and the updated associations sample (that should have given me exactly what I wanted) is here.

In his example he merrily selects his VM:

$vm = gwmi MSVM_ComputerSystem -filter "ElementName='Home Server'" -namespace "root\virtualization"

Then the very easily returns the vNIC:

$vnic = $vm.GetRelated("MSVM_EmulatedEthernetPort")

That is all fine and dandy for the example.  But I tried it on a VM that is powered off, and you know what?  I got nothing back.  A NULL came back from WMI.

I searched for quite a long time trying to figure out what I was doing wrong.

In the end, I discovered I was doing nothing wrong.  The VM has to be running for this association to return the vNIC. 

I actually find this interesting.  As once the object is created, it exists, and it has properties.  I already powered the VM on and off for the MAC address to be automatically assigned.  And then I can’t query it.  It makes little sense to me.  Maybe I can get Ben to respond and fill in that lack in my understanding.

In the end I simply modified my script.  I have to briefly power on the VM and then off again to automatically assign the MAC, so why not take advantage of that.

Here is what I simply have now:

$vm = Get-WmiObject Msvm_ComputerSystem -Filter "ElementName=$vmName" -Namespace "root\virtualization"
$vm.RequestStateChange(2) # start
$vnic = $vm.GetRelated("Msvm_EmulatedEthernetPort") # this only returns while the VM is running
$vm.RequestStateChange(3) # stop

Friday, October 21, 2011

Setting the WinRM HTTPS listener

A recent puzzle of mine has been to configure the HTTPS listener for WinRM.  You might ask; why?  Because it is supported!  And you supposedly can.

This applies to both WinRM and PowerShell remoting.

I say “supposedly” because this has been a messy trip.  And all of the documentation has been of nearly no help, leading me to believe that it is just supposed to work and I must be an idiot for it not working.

Back in 2008 I wrote about securing WinRM using a self signed certificate.  Well, guess what is now blocked.  Using self-signed certificates for WinRM.

So, we move forward, attempting to embrace the security model.

One thing to understand, when using HTTPS with WinRM you must:

  • have a certificate with a CN that matches the hostname of the server
  • use the hostname to connect to the remote machine

In my case I have a private CA that I use, and I simply import the CRL into each server as it is not published to allow CRL lookup.

There has been a litany of errors along the way, far too many for me to attempt to capture.  Lets just say that many have been very obscure and strange failures that have error messages with very little to do with the actual problem.

In the end there are two commands that you want to work on your Server; they are:

winrm create winrm/config/listener?Address=*+Transport=HTTPS @{Hostname=($env:COMPUTERNAME);CertificateThumbprint=($sslCert.Thumbprint)}

or

Set-WSManQuickConfig –useSSL

To get to this point you need to have a certificate authority, and you need to get your certificate on your server.  The CN of your certificate must match the servername (and this is picky too, the case / mixed case must match or you will get an error).  A tip – pay attention to the error message as it has the proper string that it is looking for.

WinRM runs under the NETWORK SERVICE security context.  This is pretty restrictive, so it most likely does not have access to the private key of your certificate.  Because it doesn’t have access it can’t do the encryption and nothing happens.  The setup fails.

Here is the little piece of script that fixes it all up:

$sslCert = Get-ChildItem Cert:\LocalMachine\My | where {$_.Subject -match $env:COMPUTERNAME}

"The installed SSL certificate: " + $sslCert.Subject

###  Give the Network Service read permissions to the private key.

$sslCertPrivKey = $sslCert.PrivateKey

$privKeyCertFile = Get-Item -path "$ENV:ProgramData\Microsoft\Crypto\RSA\MachineKeys\*" | where {$_.Name -eq $sslCertPrivKey.CspKeyContainerInfo.UniqueKeyContainerName}

$privKeyAcl = (Get-Item -Path $privKeyCertFile.FullName).GetAccessControl("Access")

$permission = "NT AUTHORITY\NETWORK SERVICE","Read","Allow"

$accessRule = new-object System.Security.AccessControl.FileSystemAccessRule $permission

$privKeyAcl.AddAccessRule($accessRule)

"Modifying the permissions of the certificate's private key.."

Set-Acl $privKeyCertFile.FullName $privKeyAcl

After you run this, then you can configure the HTTPS listener for WinRM using either of the commands I previously mentioned.

Monday, April 4, 2011

Sneaking around the lack of name resolution in Azure

This is one of those things that you will most likely run into if you try to run a traditional enterprise application in Azure – there is no name resolution.

Over many years enterprise applications have gone through the evolution of moving from IP addresses to relying on WINS to now DNS.  This move to using machine names provides great flexibility to server administrators to replace boxes at will, simply by editing a DNS entry or renaming the new server to the old server.  No need to update the configuration of the application.

Well, now we have Azure.  And although it is not Infrastructure as a Service, if you use a VM Role for some component of a historic enterprise application you do expect familiar features.

One way to handle this is to use Azure Connect.  Connect provides name resolution for the machine that participate in the virtual network.  However you only get IPv6 endpoint addresses back.  And this is useful for machine to machine communication but not for much else.

Another hitch is that in Azure machine names change.  Since all of the images are prepared with sysprep they come out of sysprep with new machine names (each provisioned instance needs to be unique, right?).  All that I know is that my worker tier machine will get new names if something happens and an instance gets replaced.  Or is someone stops my service and then starts it again, or reimages one of my instances.  With this going on, name resolution actually doesn’t help me much.

Well, I had a situation where I absolutely needed name resolution.  And that is one piece of information that I cannot query through the Azure Service Runtime.  So I have a homegrown solution – I edit the HOSTS file on each server.

In my example I only need to know the machine name of all of the instances of a particular role – so I query that to get the IP addresses.  I then turn around and use WinRM to query those instances and get the DNSHostName back from them.

I am using WinRM and not WMI because it is a single, incoming, well known port.  So I only have to define one endpoint at the Role level.  Through a bit of searching I discovered that WMI is not so fixed and I didn’t want to make it so.

Here is how it goes.  Warning:  I am not securing any of this.  I use HTTP for WinRM, and I reduce the PowerShell script execution security.  If you need to be secure and tight, then you need to tighten that up.

In my sysprep unattend.xml I first change the PowerShell execution policy.  I then run a script to set the WinRM service and client.  I then have a wait to give each instance a change to set the WinRM settings.  Then I query the Azure Service Runtime for the role instances and their IP addresses, then through WinRM I touch each server and get its DNSHostName.  Last, I append the local HOSTS file adding this information.  This executes on each server – they are all clones of each other after all.

Don’t forget to add the Internal Endpoint of 5985 to the Role definition in your service.  If you don’t, none of this matters.  If you secure this, use the endpoint of 5986.

Setting WinRM on each client (unsecurely, be aware of that):

<#
.SYNOPSIS
    A script to set the WinRM firewall rules and to configure the service and the
    client.  This enables unsecured communication.
.DESCRIPTION
    This script is designed to simply set up WinRM for remote unsecured communication.
    QuickConfig opens the firewall, the service settings allow remote connections,
    the client setting enables unsecured calling from the client to the remote service.
.LEGAL
    SCRIPT PROVIDED "AS IS" WITH NO WARRANTIES OR GUARANTEES OF ANY KIND, INCLUDING BUT NOT LIMITED TO
    MERCHANTABILITY AND/OR FITNESS FOR A PARTICULAR PURPOSE.  ALL RISKS OF DAMAGE REMAINS WITH THE USER, EVEN IF THE AUTHOR,
    SUPPLIER OR DISTRIBUTOR HAS BEEN ADVISED OF THE POSSIBILITY OF ANY SUCH DAMAGE.  IF YOUR STATE DOES NOT PERMIT THE COMPLETE
    LIMITATION OF LIABILITY, THEN DELETE THIS FILE SINCE YOU ARE NOW PROHIBITED TO HAVE IT.  TEST ON NON-PRODUCTION SERVERS.
.AUTHOR
    Brian Ehlert, Citrix Labs, Redmond, WA, USA
.REFERENCES
    Thank you TechNet. For examples. And a random forum post for the single quote fix.
#>

winrm quickconfig -quiet
winrm set winrm/config/service '@{AllowUnencrypted="true"}'
winrm set winrm/config/service/auth '@{Basic="true"}'
winrm set winrm/config/client '@{AllowUnencrypted="true"}'
winrm set winrm/config/client
'@{TrustedHosts="*"}'

Now, to enumerate the information from the service runtime and append the HOSTS file:

<#
.SYNOPSIS
    A script to set the HOSTS file for Azure VMs to allow proper name resolution.
.DESCRIPTION
    In an Azure environment name resolution might not be available or might resolve IPv6 addresses.
    The Azure RuntimeService is queried to discover the IP addresses of other role members.  And then
    WinRM is used to query the DNSHostName of the other servers.
    The results are then appended to the HOSTS file.
.LEGAL
    SCRIPT PROVIDED "AS IS" WITH NO WARRANTIES OR GUARANTEES OF ANY KIND, INCLUDING BUT NOT LIMITED TO
    MERCHANTABILITY AND/OR FITNESS FOR A PARTICULAR PURPOSE.  ALL RISKS OF DAMAGE REMAINS WITH THE USER, EVEN IF THE AUTHOR,
    SUPPLIER OR DISTRIBUTOR HAS BEEN ADVISED OF THE POSSIBILITY OF ANY SUCH DAMAGE.  IF YOUR STATE DOES NOT PERMIT THE COMPLETE
    LIMITATION OF LIABILITY, THEN DELETE THIS FILE SINCE YOU ARE NOW PROHIBITED TO HAVE IT.  TEST ON NON-PRODUCTION SERVERS.
.AUTHOR
    Brian Ehlert, Citrix Labs, Redmond, WA, USA
.REFERENCES
    Thank you to Jason Fossen (
http://blogs.sans.org/windows-security/). And to TechNet. For examples.
#>

# this is a local administrator and user name that is established in the VM
# Azure RDP access will automatically create / inject a user account that is defined
# Otherwise you need to establish a user account using your unattend.xml
$userName = "administrator"
$password = "Citrix`$2"
# Note:  I am using a plain text password.

# Add the Service Runtime snap-in to the standard Windows PowerShell command shell.
add-pssnapin microsoft.windowsazure.serviceruntime

# Take the VM Instance offline with Azure
Set-RoleInstanceStatus -Busy

$HostsFilePath = "$env:systemroot\system32\drivers\etc\hosts"

# Test the Hosts file by adding LocalHost entries
"127.0.0.1 localhost"  | add-content $HostsFilePath -force
"::1 localhost"  | add-content $HostsFilePath -force
if (-not $?) { "Error writing to hosts file!" ; return }

# Discover the other members of the Role
# It is not possible to have a server discover the Role that it is; as is the question "what am I" - it must be hardcoded.
# Enumerate all of the instances of the role named MyRole
$roleMem = Get-RoleInstance -Role MyRole

# Discover the endpoint IP the service is not necessary as it is the same for all
foreach ($roleIn in $roleMem) {

    # Find the WinRM port number
    foreach ($roleInEnd in $roleIn.InstanceEndpoints.Values){
        if ($roleInEnd.IPEndpoint.Port.Equals(5985)){
            #Get the IP of the endpoint
            $endIp = $roleInEnd.IPEndpoint.Address.ToString()
        }
        else{}
    }
   
    # winrm get wmi/root/cimv2/Win32_ComputerSystem (I simply find is easier to treat this as XML)
    $remoteServer = [xml](winrm enum wmi/root/cimv2/Win32_ComputerSystem -r:$endIp -encoding:utf-8 -a:basic -u:$userName -p:$password -format:pretty)
   
    # Add the entry to the HOSTS file
    $endIp + "`t" + $remoteServer.Results.Win32_ComputerSystem.DNSHostName
    $endIp + "`t " + $remoteServer.Results.Win32_ComputerSystem.DNSHostName |  add-content $HostsFilePath -force
   
}

That is it.  I use two scripts with a wait sequence in between (I use my random sleep script a couple articles back) since each machine is independent and must be able to call out to the others – the timing for WinRM happening early is important.

Monday, July 26, 2010

WSMAN Namespace Handling in PowerShell

For some time now I have been working on handling XML with PowerShell – not XML that I make mind you, that appears to be relatively easy as the plethora of examples out there keeps showing me.

I am handling XML that I get back as a blob from a call to a WS-MAN provider.  It has Namespaces – that changes the game big time.

The best general reference I have found is Dr. Tobias Weltner (he is the brilliant person behind PowerShellPlus – which is an IDE that I simply don’t know how people write complex PowerShell scripts without).  This article; http://powershell.com/cs/blogs/ebook/archive/2009/03/30/chapter-14-xml.aspx talks about XML and PowerShell, but it misses the one thing that I needed, Namespace handling. 

A bit of digging let me to a C# article about xpath and xml namespaces – that sent me to the real tidbit I needed Select-Xml; http://technet.microsoft.com/en-us/library/dd347617.aspx

First I needed to workout what my namespace selection problem really was.  Here is the mess that I get back:

<n1:SomeCimMethod_OUTPUT xmlns:n1=http://schemas.someone.com/wbem/wscim/1/cim-schema/2/SomeCimClass xmlns:wsa=http://schemas.xmlsoap.org/ws/2004/08/addressing xmlns:wsman=http://schemas.dmtf.org/wbem/wsman/1/wsman.xsd xmlns="http://schemas.dmtf.org/wbem/wsman/1/wsman.xsd" xml:lang=""> <n1:ThingOne><wsa:Address>http://schemas.xmlsoap.org/ws/2004/08/addressing/role/anonymous</wsa:Address> <wsa:ReferenceParameters><wsman:ResourceURI>http://schemas.someone.com/wbem/wscim/1/cim-schema/2/Image</wsman:ResourceURI><wsman:SelectorSet><wsman:Selector name="__cimnamespace">root/cimv2</wsman:Selector><wsman:Selector Name="CreationClassName">Image</wsman:Selector><wsman:Selector Name="ID">2c8ba04e-53b8-504d-f616-061a43bb46bf/969f4a72-4a0d-4044-b41e-f3025377d067</wsman:Selector><wsman:Selector Name="CreationClassName">Creator</wsman:Selector><wsman:Selector Name="Name">2c8ba04e-53b8-504d-f616-061a43bb46bf</wsman:Selector></wsman:SelectorSet></wsa:ReferenceParameters></n1:ThingOne><n1:ThingTwo>57702fd0-9e92-43dc-9ac6-537719b73473</n1:ThingTwo><n1:ThingThree>4e4449df-8710-4358-8290-44d7b4264d46=403ef95b-0309-417e-86d8-c75066439419,c735019c-2198-4d53-a6ac-668d38e6a81d=eb15c741-5a05-4377-91b5-7bd95ab21f3d,2b2ad08b-ecdf-42de-9f03-1050862b99fb=e2aae65c-dd64-49f3-a796-e12fecdc2b46,97c47f43-55af-438f-83b9-2d4a01733ce7=fff39bf0-9d21-4475-b7c7-9e96eb35e8d8,ee8e54e2-b499-438f-a62f-67c024e5921a=ebc63996-6399-4ffd-a5ad-6bd0dcf2036f,6fa65d8c-7cbb-438f-a2ea-35e498c525c5=ae960929-4cd6-42b3-9159-f4e0119cae92,80855f0f-1e22-44bf-892c-c8ca1fd7af59=30dd2807-5566-4655-822a-4f6780f0fdaa,57702fd0-9e92-43dc-9ac6-537719b73473=969f4a72-4a0d-4044-b41e-f3025377d067</n1:ThingThree><n1:ThingFour>57702fd0-9e92-43dc-9ac6-537719b73473</n1:ThingFour><n1:ReturnValue>0</n1:ReturnValue></n1:SomeCimMethod_OUTPUT>

If you look into this blob (there is a good reason developers call these blobs) you will see that each element is preceeded by the namespace “n1”.  Howerver, if you simply cast this to $blob = [xml]$blob it looks entirely different and you don’t really realize that each element is part of namespace “n1”.

PS > $blob.SomeCimMethod_OUTPUT

n1            : http://schemas.someone.com/wbem/wscim/1/cim-schema/2/SomeCimMethod
wsa           : http://schemas.xmlsoap.org/ws/2004/08/addressing
wsman         : http://schemas.dmtf.org/wbem/wsman/1/wsman.xsd
xmlns         : http://schemas.dmtf.org/wbem/wsman/1/wsman.xsd
lang          :
ThingOne  : ThingOne
ThingTwo     : 57702fd0-9e92-43dc-9ac6-537719b73473
ThingThree  : 4e4449df-8710-4358-8290-44d7b4264d46=403ef95b-0309-417e-86d8-c75066439419,c735019c-2198-4d53-a6ac-668d38e6a81d=eb15c741-5a05-4377-91b5-7bd95ab21f3d,2b2ad08b-ecdf-42de-9f03-1050862b99fb=e2aae65c-dd64-49f3-a796-e12fecdc2b46,97c47f43-55af-438f-83b9-2d4a01733ce7=fff39bf0-9d21-4475-b7c7-9e96eb35e8d8,ee8e54e2-b499-438f-a62f-67c024e5921a=ebc63996-6399-4ffd-a5ad-6bd0dcf2036f,6fa65d8c-7cbb-438f-a2ea-35e498c525c5=ae960929-4cd6-42b3-9159-f4e0119cae92,80855f0f-1e22-44bf-892c-c8ca1fd7af59=30dd2807-5566-4655-822a-4f6780f0fdaa,57702fd0-9e92-43dc-9ac6-537719b73473=969f4a72-4a0d-4044-b41e-f3025377d067
ThingFour : 57702fd0-9e92-43dc-9ac6-537719b73473
ReturnValue   : 0

In my example I am looking for the element “ThingTwo” which is really “n1:ThingTwo”.  The detail is that it exists within namespace “n1” and because of that $blob.SelectNodes and $blob.SelectSingleNode were totally failing me.

So, how do I find a single element within this?

First, my $blob has to be an XML document, in this case the return from the WS-MAN provider is all formatted properly, I just need to cast it to an XML document (as in PowerShell everything is a generic type of Object by default).

$blob = [xml]$blob

$blob.GetType() should return “XmlDocument” as the Name.

Then i have to make the XML parser aware of the namespace and pass that into the Select-Xml method.

$namespace = @{n1=http://schemas.someone.com/wbem/wscim/1/cim-schema/2/SomeCimMethod}

Now I can use Select-Xml to find my element.

Select-Xml -Xml $blob -Xpath "//n1:ThingTwo" -Namespace $namespace

Wednesday, May 5, 2010

PowerShell DateTime to CIM_DateTime

Obviously no one that is using PowerShell is using WSMAN against a remote Linux system.  Everything assumes WMI, simple enough.

Use WSMAN against Linux and you enter into a insane land of XML and properly formatting your XML.

Take for example the simple act to send an XML string that queries a time period.

In PowerShell you type Get-Date and you get a nice, human friendly value back: Wednesday, May 05, 2010 10:24:14 AM

Now, try to send that to a CIM provider of any type (in my case a CIM provider that sits behind a WSMAN interface) and you immediately get a value invalid error.

off to Bing-land.. searching, searching, searching – absolutely nothing.  Wait, there are a couple useful things…

on MSDN the Scripting API Objects, the SWbemDateTime Object.  The what?  you say.  Isn’t it obvious? (I didn’t think so).

Here is the kicker, the CIM_DateTime format.  It expects this really strange format that looks like this:  yyyymmddHHMMSS.mmmmmmsUUU

So how do I take this:  Wednesday, May 05, 2010 10:24:14 AM and turn it into this: 20100505102415.000000-420

I have to play with objects in PowerShell, here is my script part:

$startTimeWindow = ((Get-Date) - $9Minutes)
$objScriptTime = New-Object -ComObject WbemScripting.SWbemDateTime
$objScriptTime.SetVarDate($startTimeWindow)
$startTime = $objScriptTime.Value

I first set my time window to begin 9 minutes before ‘now’.  I then create a SWbemDateTime object from the Wbem.Scripting class.  I then take the start of my time window and set this friendly formatted time to the object.  Then I retrieve the value of the object and I have a CIM_DateTime to send off to my Linux system CIM interface (through WSMAN).

Wednesday, February 10, 2010

The response that the WS-Management service computed exceed the internal limit for envelope size.

I have been hiding in PowerShell and WSMAN land for quite a few weeks now.  And each time I set up a new client machine or I scale out the number of VMs in my environment I run against this error:

Exception calling "Enumerate" with "1" argument(s): "The response that the WS-Management service computed exceed the internal limit
for envelope size. "

What am I doing?  Well, right now I am calling an enumerate class through WSMAN and listing all of the VMs that I have on a hypervisor.

Why do I get the error?  I know why, it is because the return string is so freaking large that the client side of WSMAN (the WinRM listener on my client PC where I am running the query from) says: “hey, my allocated buffer is full and you are trying to feed me ‘just one more wafer thin mint’”

Instead of exploding all over the place I get this nice, friendly warning.

How do I tweak my client to increase the receive envelope size?

Open an elevated command prompt (run as admin) and type:

winrm set winrm/config @{MaxEnvelopeSizekb="1024"}

Note = you do not need to set yours to 1024, I just set it higher than the default.

This was the last setting I had, but I need to go higher as I add more and more VMs.  One to 2Mb I go…

Monday, September 29, 2008

Securing Hyper-V WinRM with a Self Signed certificate

It is funny. When you are working on things you just take some things for granted.

After all, you would expect that generating a self signed certificate for use with testing communication with Server 2008 would be some sort of built-in function right?

I mean if you Google around you can find all kinds of instructions, but they all have one big general assumption – IIS is installed. I don’t know about you, but I am a purist on my servers, a service does not get installed that is not being used. I refuse to install IIS just to generate a self signed certificate (oh, Exchange does this for OWA too).

Considering that this article is about securing WinRM (Windows Remote Management) traffic with SSL on Hyper-V – why do I want to install IIS on my Hyper-V host just to set this up?? This was my challenge.

I have checked out the Microsoft instructions for securing WinRM: http://technet.microsoft.com/en-us/library/cc782312.aspx

I have two comments – difficult to read and tailored to Server 2003. They are not ‘no brainer’ type of instructions and there are easier ways to do this. So, for my notes I decided to document this, and did it here to share.

    The assumptions:

    • I want to use a self signed certificate (No need to mess around with a Certificate Server or IIS when all you want to do is some quick testing over SSL).

    • I want this to be simple.

    Okay, how to generate a self signed certificate on Hyper-V (Server 2008).

    The tools:

    Not a simple right click anywhere. Days of searching turned up little. The easiest way to do this is: Install IIS – didn’t I say no to that already?

    I discovered two ways to generate a self signed certificate that met my needs: MakeCert.exe and SelfSSL.exe

    MakeCert.exe is for testing only and comes in Visual Studio – any developer would jump on this in a heartbeat.

    SelfSSL.exe is a part of the IIS 6 Resource Kit. – Resource kit = administrator friendly.

    I settled on SelfSSL because I found better documentation and it did more work for me.

    Click on the link above, download the resource kit, and run the installer to extract just SelfSSL.exe, copy it somewhere convenient.

    I have SelfSSL, now what?

    (You may notice that I have more instruction than is necessary – that is for the curious among us)

    Open a command prompt (don’t leave the prompt, we will be here for a bit).

    Check your WinRM listener status winrm enumerate winrm/config/listener (this will list any listeners that are already configured – if you ran winrm quickconfigure at any time you will see an HTTP listener)

    Switch to the folder where you placed SelfSSL.exe

    Go ahead, type: SelfSSL /? (you know that you want to)

    1.SelfSSL

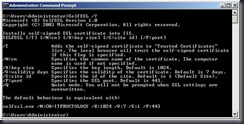
    Note the default behavior. If you only typed SelfSSL you would get a certificate with your local machine name (“ITProctology” in my case), good for 7 days, with a 1024 bit key, bound to web site 1 (but I don’t have one..) and port 443. All fine.

    I want to generate a certificate using my local machine name, good for 60 days, and have it automatically registered into the Trusted Root Certificate Authority of my server.

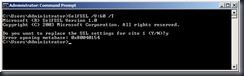
    To do this I type: SelfSSL /V:60 /T (I am going to accept all the other defaults)

    I am prompted to replace the SSL settings for site 1 – say yes. (if you say no, the certificate is not created nor registered with the Trusted Root CA).

    2.SelfSSL

    Oh no, I have an error..that I can freely ignore, IIS isn’t here (no metabase) so no problem.

    Now, open up the MMC, add the Certificates snap-in for the Computer account.

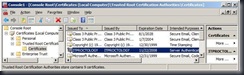
    You will notice that you have a Personal certificate issued to and by your machine name.

    3.SelfSSL

    If you open the Trusted Root CA, you will see that it is registered there as well.

    4.SelfSSL

    Easy enough.

    Create the WinRM HTTPS listener

    Now we need to create the Windows Remote Management listener and bind it to the certificate.

    Stay in the Certificates MMC.

    Select the self signed certificate from the Personal store. Double click it to open it.

    Select the Details tab. Scroll down to the Thumbprint field and select it.

    Select and copy the Thumbprint in the details window so you can insert it in the next step.

    5.SelfSSL

    Return to the command prompt

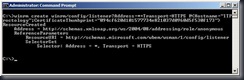
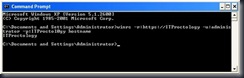
    Type: winrm create winrm/config/listener?Address=*+Transport=HTTPS @{Hostname=”<the name of your server>”;CertificateThumbprint=”<Paste from the previous step and remove the spaces>”}

    *Be sure to remove the spaces from the thumbprint string

    This command creates a listener on the HTTPS port (443) using any / all network address of the server, and my SelfSSL generated certificate.

    Mine looks like this:

    6.SelfSSL

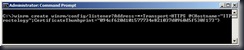
    After hitting return I get a confirmation message that the listener created.

    7.SelfSSL

    Modifying the Firewall rules (if necessary)

    Now, we are working with Server 2008 here. If I had run winrm quickconfig I would end up with the default HTTP listener and the built-in, inbound, firewall rule is enabled. Also, my server is in a workgroup so it is pretty shut down by the firewall.

    There isn’t a built-in rule for using WinRM with SSL so we will have to create our own.

    Open Windows Firewall with Advanced Security from the Administrative Tools menu.

    Right click the Inbound Rules and select New Rule – the new rule wizard opens.

    I want to enable a port (443 to be exact – remember no IIS, so this has not been opened for any previous purpose or by any other widget)

    Select the port radio button.

    On the Protocol and Ports screen select TCP and enter the specific port 443.

    On the Action screen select Allow the connection.

    For Profile I am going to select all three, since my server is in a workgroup.

    Give the rule a name and you are done.

    You should see your new Rule, and it should be enabled (green check box).

    Test your configuration

    This is always one of those steps that no one does. Actually, I totally forgot about the firewall rules until I did this.

    At your server type and connection and a command, such as:

    8.SelfSSL

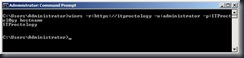
    If I used HTTP I would have an error, since I only enabled an HTTPS listener.

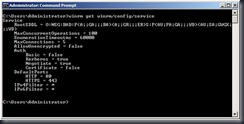
    To check your WinRM service configuration:

    9.SelfSSL

    Accepting the certificate from the remote machine

    From my remote machine I need to accept the self signed certificate so that I can use it.

    Ay my remote machine I open Internet Explorer and type HTTPS://<my other server name> and after I moment I am greeted with a certificate warning.

    10.SelfSSL

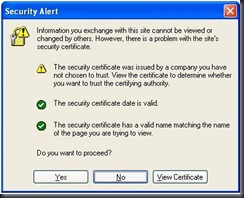
    Select View Certificate.

    11.SelfSSL

    Select Install Certificate.

    Accept and import the certificate and key pair and complete the wizard.

    Now select Yes to proceed.

    And I get a 404 page not found error – perfect, exactly what I expect.

    Testing the connection

    From the client, open a command prompt and type the same command that we typed at the Server (above).

    12.SelfSSL

    It works. Now you have a working WinRM listener using HTTPS, nice and secure.

    Troubleshooting

    The biggest items that you can run into are:

    The firewall – we talked about that.

    WinRM security – I didn’t touch that.

    WinRM security might need to be modified to allow communication to properly flow; it totally depends on the situation.

    Basic security might need to be enabled. Hosts might need to be trusted. In the case of HTTPS encryption might need to be turned off.

    This could be an entire post all to itself. I will save it for later.

    .