As a condition for paravirtualization to work, a kernel that supports the Xen hypervisor needs to be installed and booted in the virtual machine. Simply installing the XenServer tools within the vm does not enable paravirtualization of the vm.
In this example; the virtual machine was exported as an OVF package from VMware and imported into XenServer using XenConvert 2.0.1.
Installing the XenServer Supported Kernel:
1. After import, boot the virtual machine and open the console.
2. (optional) update the modules within the vm to the latest revision
a. If the kernel-xen package is installed from an online repository – best practice is to fully update the distribution to avoid problems between package build revisions.
3. Install the Linux Xen kernel.
a. yast install kernel-xenpae
i. the xen aware kernel is installed and entries are created in grub
ii. x64 can use kernel-xen, x86 requires kernel-xenpae
iii. This is not the same as installing “xen” which installs a dom0 kernel for running vms, not a domU kernel for running as a vm.
iv. yast is the package installer for SLES, Debian uses apt (apt-get).
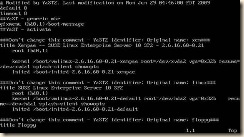
4. Modify the grub boot loader menu (the default entries are not pygrub compatible)
Open /boot/grub/menu.lst in the editor of your choice
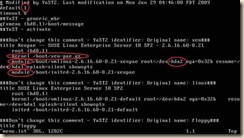
a. Remove the kernel entry with ‘gz’ in the name
b. Rename the first “module” entry to “kernel”
c. Rename the second “module” entry to “initrd”
i. SuSE and Debian require that entries that point to root device locations described by a direct path such as: “/dev/hd*” or “/dev/sd*” be modified to point to /dev/xvd*
d. (optional) Modify the title of this entry
e. Edit the line “default=” to point to the modified xen kernel entry
i. The entries begin counting at 0 – the first entry in the list is 0, the second entry is 1 and so on
ii. In our example the desired default entry “0”
f. (optional) Comment the “hiddenmenu” line if it is there (this will allow a kernel choice during boot if needed for recovery)
g. Save your changes
1. Edit fstab because of the disk device changes
a. open /etc/fstab in the editor of your choice.
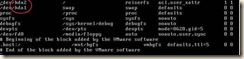
b. Replace the “hd*” entries with “xvd*”
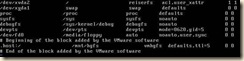
c. Save changes
2. Shut down the guest but do not reboot.
a. Shutdown now -h
Edit the VM record of the SLES VM to convert it to PV boot mode
In this example the VM is named “sles”
5. From the console of the XenServer host execute the following xe commands:
a. xe vm-list name-label=sles params=uuid (retrieve the UUID of the vm)
b. xe vm-param-set uuid=<vm uuid> HVM-boot-policy=”” (clear the HVM boot mode)
c. xe vm-param-set uuid=<vm uuid> PV-bootloader=pygrub (set pygrub as the boot loader)
d. xe vm-param-set uuid=<vm uuid> PV-args="console=tty0 xencons=tty" (set the display arguments)
i. Other possible options are: “console=hvc0 xencons=hvc” or “console=tty0” or “console=hvc0”
6. xe vm-disk-list uuid=<vm uuid> (this is to discover the UUID of the interface of the virtual disk)
7. xe vbd-param-set uuid=<vbd uuid> bootable=true (this sets the disk device as bootable)
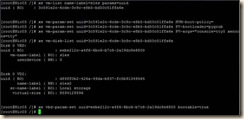
The vm should now boot paravirtualized using a Xen aware kernel.
When booting the virtual machine, it should start up in text-mode with the high-speed PV kernel. If the virtual machine fails to boot, the most likely cause is an incorrect grub configuration; run the xe-edit-bootloader (i.e. xe-edit-bootloader –n sles) script at the XenServer host console to edit the grub.conf of the virtual machine until it boots.
Note: If the VM boots and mouse and keyboard control does not work properly, closing and re-opening XenCenter generally resolves this issue. If the issue is still not resolved, try other console settings for PV-args, being sure to reboot the vm and close and re-open XenCenter between each setting change.
Installing the XenServer Tools within the virtual machine:
Install the XenServer tools within the guest:
1. Boot the paravirtualized VM (if not already running) into the xen kernel.
2. Select the console tab of the VM
3. Select and right-click the name of the virtual machine and click "Install XenServer Tools"
4. Acknowledge the warning.
5. At the top of the console window you will notice that the "xs-tools.iso" is attached to the DVD drive. And the Linux device id within the vm.
6. Within the console of the virtual machine:
a. mkdir /media/cdrom (Create a mount point for the ISO)
b. mount /dev/xvdd /media/cdrom (mount the DVD device)
c. cd /media/cdrom/Linux (change to the dvd root / Linux folder)
d. bash install.sh (run the installation script)
e. answer “y” to accept the changes
f. cd ~ (to return to home)
g. umount /dev/xvdd (to cleanly dismount the ISO)
h. In the DVD Drive, set the selection to “<empty>”
i. reboot (to complete the tool installation)
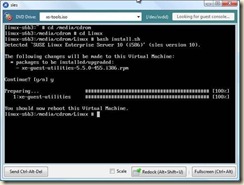
7. Following reboot the general tab of the virtual machine should report the Virtualization state of the virtual machine as “Optimized”
Distribution Notes
Many Linux distributions have differences that affect the process above. In general the process is similar between the distributions.
Removal of VMware Tools was tested following import to XenServer and I do not recommend removal of VMware Tools after the VM has been migrated to XenServer. If it is desired to remove VMware Tools, the vm must be running on a VMware platform when the uninstall command is executed within the VM ( rpm -e VMwareTools ).
Some distributions have a kernel-xenpae in addition to the kernel-xen. If PAE support is desired (or required) in the virtual machine, please substitute kernel-xenpae in place of kernel-xen in the instructions. Please see the distribution notes for full details.


