Showing posts with label SuSE. Show all posts

Wednesday, July 1, 2009

Linux vm from VMware to XenServer the videos

If you have been following, you will note quite a few posts related to importing / migrating Linux virtual machines from VMware to XenServer.

I realize that many folks don’t use XenServer – but the basic steps of repairing after migration apply to Hyper-V just as well as to XenServer – the steps are the same if you want your VM to boot. However, PV enablement on Hyper-V does not exist, you just need to install the vm tools.

Here are the links in case you missed them:

I have turned three of these into short (less than 10 minutes) video presentations, just to add a bit more information than in the articles.

Monday, June 29, 2009

PV enabling an HVM from VMware on XenServer (SLES and Debian)

As a condition for paravirtualization to work, a kernel that supports the Xen hypervisor needs to be installed and booted in the virtual machine. Simply installing the XenServer tools within the vm does not enable paravirtualization of the vm.

In this example; the virtual machine was exported as an OVF package from VMware and imported into XenServer using XenConvert 2.0.1.

Installing the XenServer Supported Kernel:

1. After import, boot the virtual machine and open the console.

2. (optional) update the modules within the vm to the latest revision

a. If the kernel-xen package is installed from an online repository – best practice is to fully update the distribution to avoid problems between package build revisions.

3. Install the Linux Xen kernel.

a. yast install kernel-xenpae

i. the xen aware kernel is installed and entries are created in grub

ii. x64 can use kernel-xen, x86 requires kernel-xenpae

iii. This is not the same as installing “xen” which installs a dom0 kernel for running vms, not a domU kernel for running as a vm.

iv. yast is the package installer for SLES, Debian uses apt (apt-get).

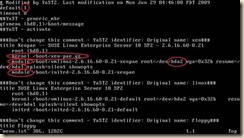
4. Modify the grub boot loader menu (the default entries are not pygrub compatible)

Open /boot/grub/menu.lst in the editor of your choice
clip_image002

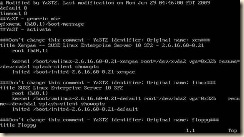
a. Remove the kernel entry with ‘gz’ in the name

b. Rename the first “module” entry to “kernel”

c. Rename the second “module” entry to “initrd”

i. SuSE and Debian require that entries that point to root device locations described by a direct path such as: “/dev/hd*” or “/dev/sd*” be modified to point to /dev/xvd*

d. (optional) Modify the title of this entry

e. Edit the line “default=” to point to the modified xen kernel entry

i. The entries begin counting at 0 – the first entry in the list is 0, the second entry is 1 and so on

ii. In our example the desired default entry “0”

f. (optional) Comment the “hiddenmenu” line if it is there (this will allow a kernel choice during boot if needed for recovery)

g. Save your changes
clip_image004

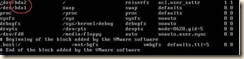
1. Edit fstab because of the disk device changes

a. open /etc/fstab in the editor of your choice.
clip_image006

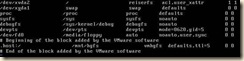
b. Replace the “hd*” entries with “xvd*”
clip_image008

c. Save changes

2. Shut down the guest but do not reboot.

a. Shutdown now -h

Edit the VM record of the SLES VM to convert it to PV boot mode

In this example the VM is named “sles”

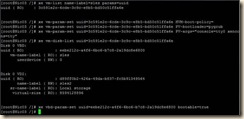
5. From the console of the XenServer host execute the following xe commands:

a. xe vm-list name-label=sles params=uuid (retrieve the UUID of the vm)

b. xe vm-param-set uuid=<vm uuid> HVM-boot-policy=”” (clear the HVM boot mode)

c. xe vm-param-set uuid=<vm uuid> PV-bootloader=pygrub (set pygrub as the boot loader)

d. xe vm-param-set uuid=<vm uuid> PV-args="console=tty0 xencons=tty" (set the display arguments)

i. Other possible options are: “console=hvc0 xencons=hvc” or “console=tty0” or “console=hvc0”

6. xe vm-disk-list uuid=<vm uuid> (this is to discover the UUID of the interface of the virtual disk)

7. xe vbd-param-set uuid=<vbd uuid> bootable=true (this sets the disk device as bootable)
clip_image010

The vm should now boot paravirtualized using a Xen aware kernel.

When booting the virtual machine, it should start up in text-mode with the high-speed PV kernel. If the virtual machine fails to boot, the most likely cause is an incorrect grub configuration; run the xe-edit-bootloader (i.e. xe-edit-bootloader –n sles) script at the XenServer host console to edit the grub.conf of the virtual machine until it boots.

Note: If the VM boots and mouse and keyboard control does not work properly, closing and re-opening XenCenter generally resolves this issue. If the issue is still not resolved, try other console settings for PV-args, being sure to reboot the vm and close and re-open XenCenter between each setting change.

Installing the XenServer Tools within the virtual machine:

Install the XenServer tools within the guest:

1. Boot the paravirtualized VM (if not already running) into the xen kernel.

2. Select the console tab of the VM

3. Select and right-click the name of the virtual machine and click "Install XenServer Tools"

4. Acknowledge the warning.

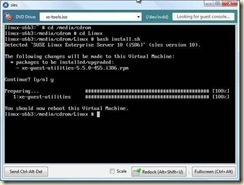
5. At the top of the console window you will notice that the "xs-tools.iso" is attached to the DVD drive. And the Linux device id within the vm.

6. Within the console of the virtual machine:

a. mkdir /media/cdrom (Create a mount point for the ISO)

b. mount /dev/xvdd /media/cdrom (mount the DVD device)

c. cd /media/cdrom/Linux (change to the dvd root / Linux folder)

d. bash install.sh (run the installation script)

e. answer “y” to accept the changes

f. cd ~ (to return to home)

g. umount /dev/xvdd (to cleanly dismount the ISO)

h. In the DVD Drive, set the selection to “<empty>”

i. reboot (to complete the tool installation)
clip_image012

7. Following reboot the general tab of the virtual machine should report the Virtualization state of the virtual machine as “Optimized”

Distribution Notes

Many Linux distributions have differences that affect the process above. In general the process is similar between the distributions.

Removal of VMware Tools was tested following import to XenServer and I do not recommend removal of VMware Tools after the VM has been migrated to XenServer. If it is desired to remove VMware Tools, the vm must be running on a VMware platform when the uninstall command is executed within the VM ( rpm -e VMwareTools ).

Some distributions have a kernel-xenpae in addition to the kernel-xen. If PAE support is desired (or required) in the virtual machine, please substitute kernel-xenpae in place of kernel-xen in the instructions. Please see the distribution notes for full details.

Thursday, May 21, 2009

The layers to Linux on Hyper-V

Recently I have been seeing and getting many questions regarding the Linux Integration Components for Hyper-V virtual machines.

Through a bit of questioning, I have discovered a couple things, and distinct levels to running Linux VMs on Hyper-V.

Note: Since SuSE 10 SP2 is the ‘supported’ distribution, any instructions will be specific to it.

I am assuming that you have obtained the SuSE media and performed a ‘vanilla’ installation into a new Hyper-V virtual machine.

WARNING: Level One can lead to Level Two. And, always perform a backup / export / snapshot before proceeding. All usual disclaimers apply.

Level One – the beginning

This is a simple installation of just the Linux operating system within a Hyper-V virtual machine. The only caveat is that the VM needs a Legacy Network adapter for network connectivity.

In this case you will end up with a working Linux VM. It should auto detect an install an SMB (multi-processor) kernel and it should just work. The performance is not the best that it could be, but it should run.

Level Two – the path to enlightenment

This is the simple installation from above, with the addition of the Hyper-V Linux drivers.

This one is a bit more involved. However, the end result is that you are running the synthetic Network Adapter, and the optimized storage, and display (and other) drivers.

This optimizes drivers, but advanced integration features such as shutdown from the host (or SCVMM) is currently not available.

To obtain driver enlightenment:

a) Obtain the LinuxIC.iso

http://www.microsoft.com/downloads/details.aspx?displaylang=en&FamilyID=ab7f4983-93c5-4a70-8c79-0642f0d59ec2#tm

b) obtain the inputvsc.iso for the mouse driver

http://www.xen.org/download/satori.html

c) add the kernel-source and gcc-c++ packages

YaST can be used for this, either GUI or command line

Note: if an ISO was previously attached, you may need to detach, pause, then attach the desired ISO for SuSE auto-mount to pick up the change.

If that does not work, make a mount point ( mkdir /media/CDROM ) and mount /dev/hdc /media/CDROM

d) Install the linuxic drivers

a. Open a Terminal

b. attach the downloaded LinuxIC.iso through the Hyper-V manager

c. Create a folder and copy the contents to the folder

d. mkdir /tmp/linuxic

e. cp –rp /media/CDROM/* /tmp/linuxic

f. cd /tmp/linuxic

g. ./setup.pl drivers

e) Install the mouse driver

a. Attach the inputvsc.iso through the Hyper-V manager

b. Create a folder and copy the contents.

c. mkdir /tmp/inputvsc

d. cp –rp /media/CDROM/* /tmp/inputvsc

Note: you may need to mount again: mount /dev/hdc /media/CDROM

e. cd /tmp/inputvsc

f. ./setup.pl

f) Power down the VM, remove the Legacy Network Adapter, add a Synthetic Network adapter, power on the VM (you could also do a shutdown now –hP)

g) Using YaST (or YaST2), configure the newly installed synthetic network adapter.

Thursday, April 16, 2009

Migrating SLES from VMWare ESX to XenServer

For SuSE Linux Enterprise Server I require a “Helper” virtual machine to mount and repair the file system. This is because SLES recovery console does not include an editor.

After migrating SuSE and booting the boot loader fails at: “waiting for device /dev/sda2.” This is as expected because /sda refers to a SCSI bus and on XenServer SuSE actually sees an /hda (IDE) boot device.

clip_image002

The Helper VM can be created using the XenServer provided Debian Etch template virtual machine (this template includes the media, making it practically ready to go). The included Debian distribution also works with the SUSE reiserFS that is installed by default.

It is also of note that SuSE has a full Xen aware kernel and can be further optimized by presentation of the boot devices as Xen Virtual Disks and by loading a paravirtualized kernel. These optimizations are outside of this article; this is specifically focused on having a running virtual machine.

Import the VM to XenServer:

In my examples I am using XenConvert 2.0 to consume the VMware OVF virtual appliances, however Citrix Project Kensho can also be used.

Creating the Helper virtual machine:

In XenCenter select VM -> New

Choose ‘Debian Etch 4.0’ as the template (this template provides the installation template plus the operating system, nothing to download).

Name the virtual machine “HelperVM” and complete the New VM wizard accepting the defaults, allow the VM to boot, and open the console of this VM.

At the console of HelperVM enter a new root password, VNC password, and a host name (‘HelperVM’ is my suggestion).

Mount the SLES virtual disk to HelperVM:

In XenCenter select the SuSE virtual machine, and then select the Storage tab.

Select the virtual disk (make a note of the disk name) and then click Detach.

clip_image004

*Note: the VM must be powered off to detach a virtual disk.

Select HelperVM, then the Storage tab, and then click Attach.

clip_image006

Select the SuSE virtual disk from the Storage Repository and click Attach.

clip_image007

Return to the HelperVM console.

Note that HelperVM should have auto-mounted the volume (in this example HelperVM was running when I attached the virtual disk). My example added the controller device xvdc with the partitions of xvdc1 and xvdc2.

clip_image008

This can also be seen in the Storage tab of XenCenter.

clip_image010

Return to the console of HelperVM and create a path to mount the volume and mount the first volume.

Mkdir /mnt/suse

mount /xvdc/xvdc1 /mnt/suse

clip_image011

Note the error that this looks like swap. I will try to mount the other volume.

clip_image012

Switch to the mounted file system and list to verify that this appears to be the root volume.

clip_image013

Repairing the boot loader:

From this point forward the process is fundamentally no different than repairing Debian or modifying the Grub menu and fstab of any Linux distribution.

I will begin by repairing fstab.

From the root of the mounted SuSE virtual hard disk (/mnt/suse) change to the /etc directory and open the fstab file in an editor.

It should look similar to my nano editor screen below:

clip_image014

I am going to modify the two entries that point specifically to a SCSI presented boot device to IDE.

Previously, in the XenCenter Storage tab for the SuSE virtual machine I observed that the virtual disk was presented on an IDE controller.

The new fstab should resemble this:

clip_image015

Now, to proceed to the Grub boot loader menu.

One way to approach this is to copy an existing entry to a new entry and make the necessary modifications to the new entry. In this example I am modifying the existing entries for the new hypervisor.

Change to the /boot/grub directory ( cd /mnt/suse/boot/grub )

And open menu.lst in an editor.

clip_image016

Find the entries that refer to /dev/sdaX and change them to /dev/hdaX. In the screen shot above this is /dev/sda2

clip_image017

Then save the modifications.

To safely continue I need to un-mount the SuSE virtual disk from the HelperVM.

Return to the root of the file system ( cd / ) and use the umount command to un-mount the xvdc2 device.

clip_image018

To continue to repair the SuSE virtual machine, the virtual disk needs to be detached from the HelperVM and attached back to the SuSE virtual machine.

Mount the SLES virtual disk to the SuSE VM:

Begin by shutting down HelperVM.

clip_image019

Select the Storage tab of HelperVM. Select the SuSE virtual disk and select Detach.

clip_image021

Select the SuSE virtual machine, select the Storage tab, click Attach

clip_image023

Select the correct virtual disk and Attach.

clip_image024

Open the console of the SuSE virtual machine and power it on.

Additional repairs:

As with other Linux distributions, if X server was used to present a graphical console it will require repair due to the capabilities of new video devices.

clip_image025

X server is then disabled.

clip_image026

To repair X server, logon as root and repair the X server by running SaX2

At the command prompt execute the command sax2 -f

At the completion of the wizard X server can be started by executing startx or rebooting.

The one thing that you will notice is that there is no mouse support. Setting up VNC Server within the virtual machine and connecting to a graphical console using this VNC connection can resolve this situation.